

Enter/update/exit animation
Now that you know how to use transitions, it's time to take it up a notch. Enter/exit animations.
Enter/exit animations are the most common use of transitions. They're what happens when a new element enters or exits the picture. For example: in visualizations like this famous Nuclear Detonation Timeline by Isao Hashimoto. Each new Boom! flashes to look like an explosion.
I don't know how Hashimoto did it, but with React & D3, you'd do it with enter/exit transitions.
Another favorite of mine is an old animated alphabet example by Mike Bostock, the creator of D3, that's no longer online.

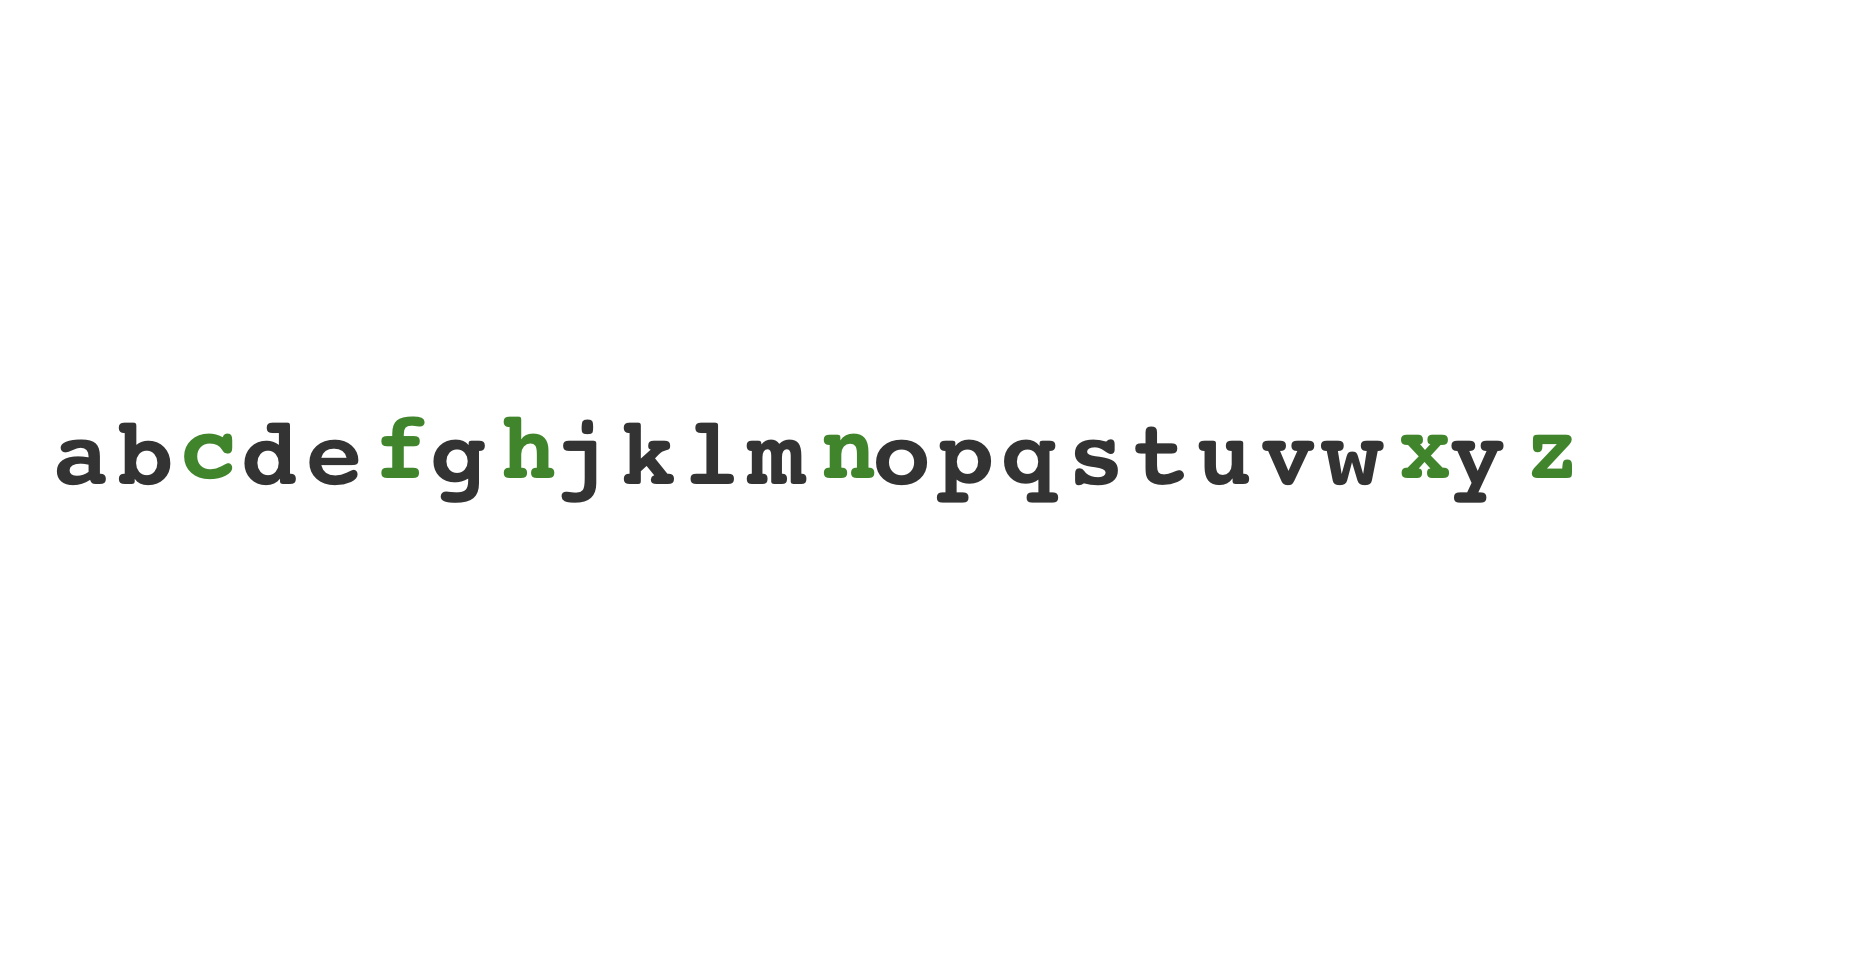
That's what we're going to build: An animated alphabet. New letters fall down and are green, updated letters move right or left, deleted letters are red and fall down.
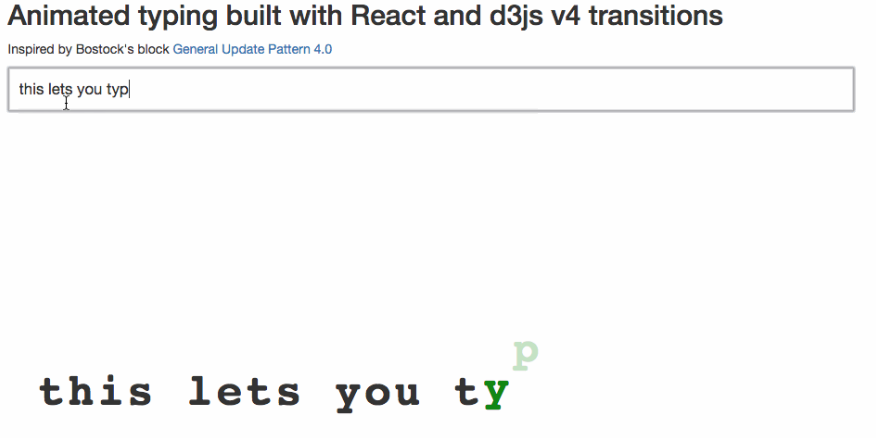
You can play with a more advanced version here. Same principle as the alphabet, but it animates what you type.
We're building the alphabet version because the string diffing algorithm is a pain to explain. I learned that the hard way when giving workshops on React and D3…

See?
Easy on paper, but the code is long and weird. That, or I'm bad at implementing it. Either way, it's too tangential to explain here. You can read the article about it.
Animated alphabet
Our goal is to render a random subset of the alphabet. Every time the set updates, old letters transition out, new letters transition in, and updated letters transition into a new position.
We need two components:
Alphabet, which creates random lists of letters every 1.5 seconds, then maps through them to renderLettercomponentsLetter, which renders an SVG text element and takes care of its own enter/update/exit transitions
You can see the full code on GitHub here.
Project setup
To get started you'll need a project. Start one with create-react-app
or in CodeSandbox. Either works.
You'll need a base App component that renders an SVG with an <Alphabet>
child. Our component is self-contained so that's all you need.
Something like this 👇
import Alphabet from './components/Alphabet`;const App = () => (<svg width="100%" height="600"><Alphabet x={32} y={300} /></svg>)
I follow the convention of putting components in a src/components directory.
You don't have to.
Remember to install dependencies: d3 and react-transition-group
The Alphabet component
The Alphabet component holds a list of letters in component state and renders
a collection of Letter components in a loop.
We start with a skeleton like this:
// src/components/Alphabet.jsimport React from "react";import * as d3 from "d3";import { TransitionGroup } from "react-transition-group";import Letter from "./Letter";class Alphabet extends React.Component {static letters = "abcdefghijklmnopqrstuvwxyz".split("");state = { alphabet: [] };componentDidMount() {// start interval}shuffleAlphabet = () => {// generate new alphabet};render() {let transform = `translate(${this.props.x}, ${this.props.y})`;return (// spit out letters);}}export default Alphabet;
We import dependencies and define the Alphabet component. It keeps a list of
available letters in a static letters property and an empty alphabet in
component state.
We'll start a d3.interval on componentDidMount and use shuffleAlphabet to
generate alphabet subsets.
To showcase enter-update-exit transitions, we create a new alphabet every
second and a half. Using d3.interval lets us do that in a browser friendly
way.
// src/components/Alphabet/index.jscomponentDidMount() {d3.interval(this.shuffleAlphabet, 1500);}shuffleAlphabet = () => {const alphabet = d3.shuffle(Alphabet.letters).slice(0, Math.floor(Math.random() * Alphabet.letters.length)).sort();this.setState({alphabet});};
Think of this as our game loop: Change alphabet state in consistent time intervals.
We use d3.interval( //.., 1500) to call shuffleAlphabet every 1.5 seconds.
Same as setInterval, but friendlier to batteries and CPUs because it pegs to
requestAnimationFrame. On each period, we use shuffleAlphabet to shuffle
available letters, slice out a random amount, sort them, and update component
state with setState.
This process ensures our alphabet is both random and in alphabetical order.
Starting the interval in componentDidMount ensures it only runs when our
Alphabet is on the page. In real life you should stop it on
componentWillUnmount. Since this is a tiny experiment and we know
<Alphabet> never unmounts without a page refresh, it's okay to skip that
step.
Declarative render for enter/exit transitions
Our declarative enter/exit transitions start in the render method.
// src/components/Alphabet/index.jsrender() {let transform = `translate(${this.props.x}, ${this.props.y})`;return (<g transform={transform}><TransitionGroup enter={true} exit={true} component="g">{this.state.alphabet.map((d, i) => (<Letter letter={d} index={i} key={d} />))}</TransitionGroup></g>);}
An SVG transformation moves our alphabet into the specified (x, y) position.
We map through this.state.alphabet inside a <TransitionGroup> component and
render a <Letter> component for every letter. Each Letter gets a letter
prop for the text, an index prop to know where it stands, and a key so
React can tell them apart.
The key property
The key property is how React identifies components. Pick wrong, and you're gonna have a bad time. I spent many hours debugging and writing workarounds before I realized that basing my key on the index was a Bad Move™. Obviously, you want the letter to stay constant in each component and the index to change.
That's how x-axis transitions work.
You move the letter into a specific place in the alphabet. You'll see what I
mean when we look at the Letter component.
TransitionGroup
React TransitionGroup gives us coordinated control over a set of transitionable
components. Each Letter is going to be a <Transition>, you'll see.
We need TransitionGroup to gain declarative control over the enter/exit cycle.
Transition components can handle transitions themselves, but they need an in
prop to say whether they're in or out of the visualization.
Flip from false to true, run an enter transition.
true to false, run an exit transition.
We can make this change from within our component, of course. When responding
to user events for example. In our case we need that control to come from
outside based on which letters exist in the alphabet array.
TransitionGroup handles that for us. It automatically passes the correct in
prop to its children based on who is and isn't being rendered.
As an added bonus, we can use TransitionGroup to set a bunch of default
parameters for child Transitions. Whether to use enter animations, exit
animations, stuff like that. You can read
a full list in the docs.
The Letter component
We're ready for the component that can transition itself into and out of a visualization. Without consumers having to worry about what's going on behind the scenes 👌
The skeleton for our Letter component looks like this:
// src/components/Letter.jsimport React from "react";import * as d3 from "d3";import Transition from "react-transition-group/Transition";const ExitColor = "brown",UpdateColor = "#333",EnterColor = "green";class Letter extends React.Component {defaultState = {y: -60,x: this.props.index * 32,color: EnterColor,fillOpacity: 1e-6};state = this.defaultState;letterRef = React.createRef();onEnter = () => {// Letter enters the visualization};onExit = () => {// Letter drops out transition};componentDidUpdate(prevProps, prevState) {// update transition}render() {const { x, y, fillOpacity, color } = this.state,{ letter } = this.props;return (// render Transition with text);}}export default Letter;
We start with some imports and define a Letter component with a default
state. We keep defaultState in a separate value because we're going to
manually reset state in some cases.
A letterRef helps us hand over control to D3 during transitions, the
onEnter callback handles enter transitions, onExit exit transitions, and
componentDidUpdate update transitions. Render is where it call comes
together.
Each of these transition methods is going to follow the same approach you learned about in the swipe transition example. Render from state, transition with D3, update state to match.
You can make this component more flexible by moving the various magic numbers
we use into props. Default y offset, transition duration, colors, stuff like
that. The world is your oyster my friend.
onEnter
We start with the enter transition in the onEnter callback.
// src/components/Letter.jsonEnter = () => {// Letter is entering the visualizationlet node = d3.select(this.letterRef.current)node.transition().duration(750).ease(d3.easeCubicInOut).attr("y", 0).style("fill-opacity", 1).on("end", () => {this.setState({y: 0,fillOpacity: 1,color: UpdateColor,})})}
We use d3.select to grab our DOM node and take control with D3. Start a new
transition with .transition(), specify a duration, an easing function, and
specify the changes. Vertical position moves to 0, opacity changes to 1.
This creates a drop-in fade-in effect.
When our transition ends, we update state with the new y coordinate,
fillOpacity, and color.
The result is an invisible letter that starts at -60px and moves into 0px and full visibility over 750 milliseconds.
onExit
Our exit transition goes in the onExit callback.
// src/components/Alphabet/onExit = () => {// Letter is dropping outlet node = d3.select(this.letterRef.current)node.style("fill", ExitColor).transition(this.transition).attr("y", 60).style("fill-opacity", 1e-6).on("end", () => this.setState(this.defaultState))}
Same as before, we take control of the DOM, run a transition, and update state when we're done. We start with forcing our letter into a new color, then move it 60px down, transition to invisible, and reset state.
But why are we resetting state instead of updating to current reality?
Our components never unmount.
We avoid unmounts to keep transitions smoother. Instead of unmounting, we have to reset state back to its default values.
That moves the letter back into its enter state and ensures even re-used letters drop down from the top. Took me a while to tinker that one out.
render
Hard work is done. Here's how you render:
// src/components/Alphabet/Letter.jsrender() {const { x, y, fillOpacity, color } = this.state,{ letter } = this.props;return (<Transitionin={this.props.in}unmountOnExit={false}timeout={750}onEnter={this.onEnter}onExit={this.onExit}><textdy=".35em"x={x}y={y}style={{fillOpacity: fillOpacity,fill: color,font: "bold 48px monospace"}}ref={this.letterRef}>{letter}</text></Transition>);}
We render a Transition element, which gives us the transition super powers we
need to run enter/exit transitions. Update transitions work on all React
components.
The outside TransitionGroup gives us the correct in prop value, we just
have to pass it into Transition. We disable unmountOnExit to make
transitions smoother, define a timeout which has to match what we're using in
our transitions, and define onEnter and onExit callbacks.
There's a lot more to the API that we can use and you should check that out in the docs. Docs don't go into detail on everything, but if you experiment I'm sure you'll figure it out.
Inside the transition we render an SVG <text> element rendered at an (x, y)
position with a color and fillOpacity style. It shows a single letter taken
from the letter prop.
That's it 👍
Boom. We're done.
You can play with a more complex version of this example here: https://swizec.github.io/react-d3-enter-exit-transitions/. Try typing different strings and see how the visualization reacts.
The typing example uses the same Letter components to declaratively render its string, but it drives the input through your typing instead of an automatic shuffler.
Key takeaways for transitions are:
- use d3 for transitions
- use React to manage SVG elements
- use TransitionGroup and Transition for the enter/update/exit pattern